Multimedia combines interactive sound, music, graphics, and animation on a computer in a flexible format that can be easily altered to suit the learning characteristics of individual pupils. It can be a powerful, motivating and accessible media for learners with special educational needs. Visual feedback can be emphasised for pupils who have a visual impairment, highlighting text, symbols or graphics, sound can be similarly controlled and various different access control methods can be set for individual needs.
CD-ROMs in the form of talking books, multimedia encyclopaedias, dictionaries, music and video all examples of multimedia commonly used in schools. They all share the benefits of multimedia (that is a variety of modes of information and a variety of control methods). However there is a limited number of CD multimedia which can be used with pupils who have profound learning difficulties.
We have found the most successful use of multimedia with our pupils is in constructing your own multimedia. This has a simple and very important advantage: you and your pupils can construct the presentation about specific topics of their choice, on topics that interest and motivate them personally, using the information format that they respond to best and which best suits their capabilities.
These 'home-made' multimedia presentations can vary between simple single input cause and effect 'slide shows' with loud clear animations to complex branching multimedia presentations using photographs, recorded sounds, symbols and text.
There are several multimedia authoring programs on the market, we generally use Powerpoint since it is bundled with most new PCs, it can display most data formats, and it has some useful timing functions. Importantly because it is a mainstream application it is being continuously developed and improved. It is also a professional package; used and understood by many people outside the education field.
This tutorial is based on Powerpoint 97, earlier versions are not so capable or so flexible.
Getting started
There are two main animation techniques in Powerpoint that can be used to make switch accessible multimedia programs or presentations.
* Each page of a slideshow can have transition graphic effects and sounds that occur when each page is turned.
* Objects (pictures, graphics or text) within each page can have animation effects that can be set to happen when the page is turned, the object is clicked on or after a set time.
These two animation techniques can be applied separately to slide shows that can be operated from the keyboard, an overlay board, the mouse, a touchscreen or a switch.
They can also be used together creating very powerful accessible multimedia
Controlling Powerpoint shows
Getting familiar with the controls of a program allows you to use it more successfully.
Powerpoint is very flexible in allowing you to alter the control tool bar and make up new controls bars.
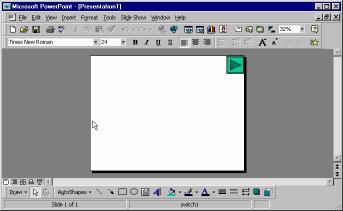
At the bottom of the Powerpoint window there is a control bar to activate Powerpoint shows:

Using these controls (the Slide Sorter View and the Slide Show View saves having to go through the View menu on the main top menu bar.
![]()
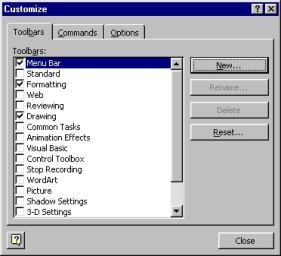
You can set up your own controls for the activities you commonly use by clicking on the customize option in the Tools menu.
At the simplest level, Powerpoint can be used to make sequential cause and effect shows using the resources found on any computer. These respond to a single input to show a new page of graphics with a connected sound.
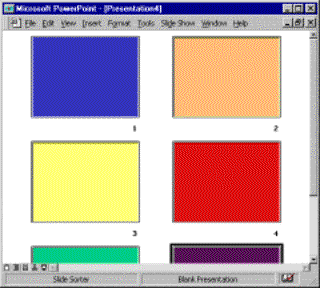
Using a very simple full page colour fill with transition effects:
This operates by simply showing pages that have different backgrounds with sound effects. When the page is turned by clicking the mouse or by pressing the space bar a new page is shown with a different background colour. Each page turn is accompanied by a sound effect and a transitional graphic effect that is activated when the page turns,
* Create a blank presentation
From the File menu choose <New>
* Select the general tab then double click on the blank presentation page
Choose from the auto layout a completely blank slide by clicking on the picture of a blank page.
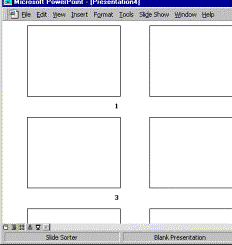
* Select the slide sorter view from the View menu
Highlight the blank slide by clicking on it and press CTRL D to copy it several times.
You will get a series of blank pages like this:
Next, add a transition visual effect so that each page turns has a visual effect.
* In the Slide show menu select Slide_Transition
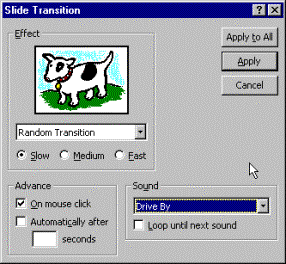
In the effects window choose Random transitions
* Set the speed to slow
* Click on Apply to All
* Under Sound choose a suitable sound and click on apply.
You have to choose different sounds for each page (you cannot have random sound effects)
* Make sure 'Advance on mouse Click' is ticked..
* Save the slideshow when you have finished from the File menu.
* You can save it as a self-running presentation if you choose
* Save As....Save As type Powerpoint show
* If you Save As....Pack and Go the slideshow will be saved in a format that will run on any PC (even if it doesn't have a copy of Powerpoint).
Powerpoint presentations can be very large, it is very easy to make presentations that will not fit on a floppy disc (actually it is difficult to make one that will fit on a single floppy). Transfer over a network, a CD or a zip disc is necessary for all but the most basic short presentations
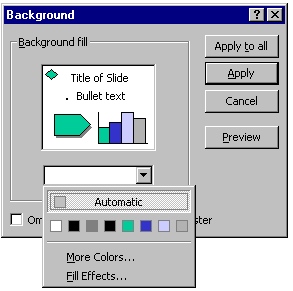
You can add more interesting graphic effects from Custom background menu: shaded, patterned textured or different colour mixes.

You can use any picture or graphic as a background:
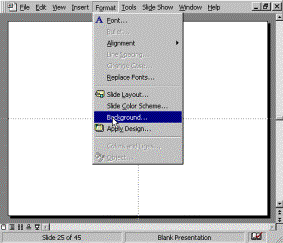
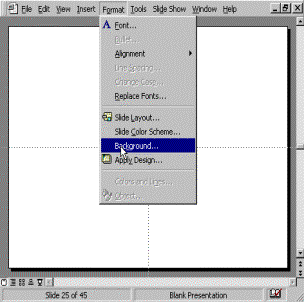
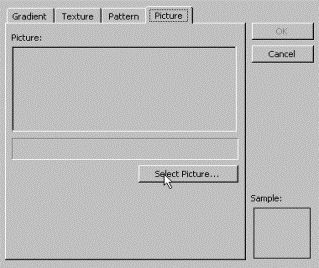
* Choose Background from the Format menu, click on fill effects and choose to add your own picture, which you can then apply transition graphic effects.
A photograph being used as a background graphic, the graphic is sized to fit the whole screen.
1. Making an animated picture presentation
This technique uses the custom animation controls to animate an object or picture on each page when the page turns:
Create a blank presentation:
Under the File menu, click New; Select the General tab and then double click on the Blank Presentation icon.
A blank slide will appear on the screen.
To add a background click on the Format menu:
Choose 'Custom Background'.
Choose a colour and shade effect if you want one and click OK.
Now your slide will be displayed with the background colour you have chosen. Next, you can add a picture.
To add a picture
Click the Insert menu and click on 'Picture'.
Choose 'Clip Art' if you want to use the Clip art from the Power Point.
Choose 'From file' if you want to use your own pictures on your computer or CD-ROM.
Locate and select the picture you want.
Click OK.
You picture will now be displayed on your slide. You can move and/or resize it if you want to. The next step is to animate the picture.
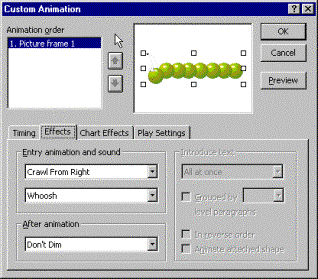
Animate the picture
Click on the Custom Animation Effects button in the Slideshow menu. From the effects tab choose an Entry animation and sound. Click on the Preview button to try out your effect.
When you are satisfied with your slide, you can add another to the slide show.
To add the next slide click on the Insert menu.
Click on New Slide and choose a blank slide.
Now you can add a background, picture and effect in the same manner.
When you have finished, click Save on the File menu, and name your presentation.
More ideas for developing simple sequential animated cause and effect pages.
If you add a blank page between every picture/reward page it slows the pace of the slideshow and it can reinforce the primary cause and effect format of the presentation.
If you insert a blank page after every picture/reward page this can reinforce the basic causal nature of each switch activation by highlighting the effect of the switch presses. You can add a switch stimulus picture or sound to these intermediate pages with a
"press your switch now" sound. You can set the sound to loop several times when the picture/reward screen is showing to extend the reward.
You can set page transitional effects as well as animation effects for objects separately (I have found that Powerpoint 97 tends to get confused if you set page transition effects, object animation and timed animation on every page)
Using a digital camera to take digital pictures or a scanner to scan in photographs you can easily construct simple linked pages with pictures of pupils or of familiar people. By adding the pictures into each slide from the Insert menu you can make slideshow pages about pupil's familiar places and activities.
You can add symbols as inserted graphics or text (in any size).
These pages can be further personalised by the addition of spoken sounds or sounds chosen or recorded by the pupils and then added to the page turning effects. In this way Pupils can make switch accessible multimedia pages about topics of their choice.
We are using Powerpoint with pupils to create their own records and reviews of their achievements in an accessible multimedia format..
We also make talking books with a picture, a symbol and text, sound effects and speech on each page.
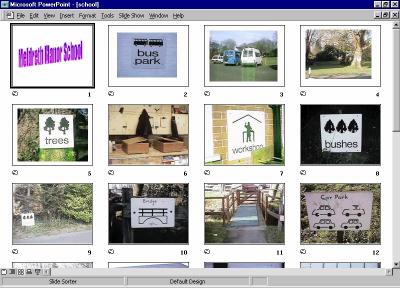
The first pages of a school trail around the school grounds using digital images and recorded sounds. Each page is linked to the next by a page turn transition.
Making several animated objects on a page
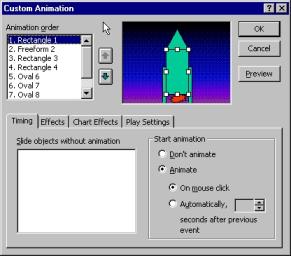
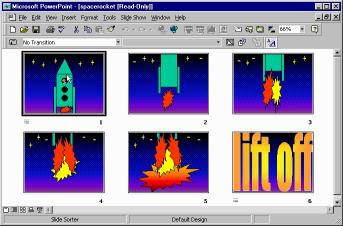
Although Powerpoint only allows you to animate an object once per page, you can animate a number of objects independently and with different timings to make a switch build presentation. Switch building is the second stage of our access progression, when accessing the switch causes another element to be added to a picture. Several switch presses are needed to complete the task, which usually ends with an animated 'reward' (there is more information on the access progression on the school web site).
To make a switch build presentation you need to make a number of objects on a single page that are sequentially animated using the custom animation controls. You need to start with a page with the finished picture that you can animate the parts separately.
Here I have drawn a space rocket as separate rectangles, circles, and triangles using the simple drawing tools in Powerpoint.
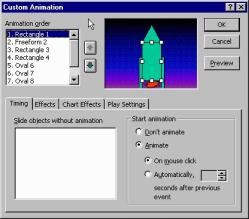
Next in the custom animation submenu (in the Slideshow menu) you need to animate each part separately by selecting that part and applying custom animation effects to it.
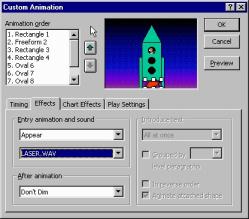
The finished presentation combines both animation techniques (custom animation to objects on a single page progressively to animate the rocket and page turning transition animations to allow the rocket to move off the screen. I have also added a few stars that are not animated and a space background.
There is a difficulty with using these simple methods of slide show presentation.
If the slideshow is being accessed through the mouse or a mouse extension switch ( Semerc mouser or similar) there is no way to turn off the mouse key auto-repeat. If the mouse button or mouse switch is pressed repeatedly then the pages will turn rapidly even after the switch has been released since the computer will store mouse presses in its input buffer. If you are using the keyboard or keyboard switches this causes no problem, you simply turn off the key autorepeat in the settings window but you cannot off totally the autorepeat on a mouse button switch.
The following technique will make a slideshow that will only respond once, even to repeated switch activations.
3. Making a slideshow presentation that will respond only to a single mouse click
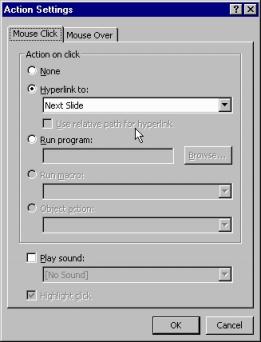
We often make slideshows that are controlled by a single switch by including an action button that is linked to the next page. If you are using a mouse extension switch the mouse pointer can be left in position over the arrow and a mouse extension switch can then be used to access the pages. It is important that these presentations respond to each single switch press and do not rapidly turn through the pages in response to repeated switch presses.
Here is a simple technique to stop repeated mouse switch presses activating the slideshow repeatedly:
Make a blank slide to start a new presentation.
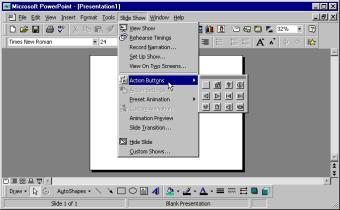
In the Slide Show menu choose action buttons,
Next choose Custom animation in the Slideshow menu.
Click on the Timing tab and animate the arrow Automatically after 2 seconds
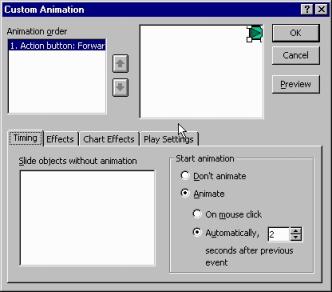
This happy combination allows the arrow to control the page turning and introduces a slight pause in the process so that repeated switch presses are ignored.
However this technique does mean that the keyboard is no longer an active input device.
You can make this switch page into template file with the page turning arrow set up by going to Save As and saving the file as a presentation template so that it will now come up when you start a new blank presentation.
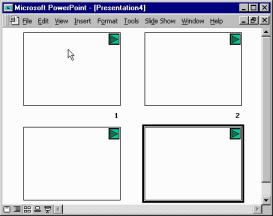
You can make your presentation/slideshow in exactly the same way adding pictures, text or animations to each page,
There are a number of examples of accessible Powerpoint slideshows/presentations on the school website: